KIBI.ONE PRESENTS…
How to Build a Crypto Wallet Using No Code Tools
“In this video tutorial I’ll show you how you can build a crypto wallet on the Ethereum or Nexus blockchain using no code tools. Simply install blockchain plugins to add a Web3 layer into your web or mobile application.”

Kibi.One is a no-code SaaS incubation program focused on helping non-technical founders build software companies. Visit our homepage to learn more about our program.
What are the Best No Code Web & Mobile App Builders Out there (2022)
In this tutorial I’ll show you how to use no code tools and freely available plugins to create a crypto wallet that you can design however you want. Begin by watching the video below to see how I built this no code crypto wallet.
Building No Code Blockchain & Web3 Platforms
Now, just before we jump in, I want to remind you that we offer a comprehensive no code blockchain development course designed for non-technical founders looking to build blockchain projects. If you’re serious about building a blockchain based platform, please check out that page.
How to Build a Crypto Wallet (Without Code)
Okay, so first of all, the wallet I’m going to build today was built using Bubble as well as the free Nexus blockchain plugin. But keep in mind that most of what I’m showing you here today can also be accomplished using bubble and the $50 plugin called “Web3 and Metamask”. We’ll be uploading more videos soon showcasing the Metamask plugin, but for now, let’s stick with the free Nexus plugin.
So let’s talk about how to build a crypto wallet using this plugin. Now this wallet can be used to transfer cryptocurrency like NXS (the way you see I have it setup in the video above), but this wallet could easily be used to transfer any assets or tokens on the nexus blockchain. Let me show you quickly how I have this setup.
Crypto Wallet: The Set Up
Again, I’m not going to go deep into detail here as it’s beyond the scope of this tutorial. Our Nexus development course alone is over 7 hours long. What I want to do now is simply introduce you to some of the top level logic. So how would we set up a wallet like this?
Well the very first thing you’d need to do is set up a login system to be able to interface with the nexus blockchain. Essentially, what you’re trying to do is you’re trying to synchronize data between two separate systems. On the one hand we have bubble and we need to satisfy their user requirements and on the other hand we have Nexus and we need to satisfy their user requirements.
Now obviously, getting users to sign up for two independent technology systems would create unnecessary friction between your users and your application. You don’t want to say, “click here to sign up for our application” and once the user logs in having another account creation form which asks them to sign up for the blockchain. So we need to think creatively about how to create accounts on two disparate systems at once.
Before we can do this we need to know the account creation requirements of both systems.
When we look at Nexus documentation we can see that to sign a user up we need the following pieces of information. We need:
– A username
– A password
– And a Pin.
Notice like most blockchains we don’t require any type of email address or personal identifiers.
Now let’s look at Bubble’s new account creation requirements. Now at a minimum, bubble requires:
– Email address
– Password
Now I want to be clear that there are a handful of ways we can deal with the new user account creation process based on the needs of your application. For example, bubble’s requirement for an email address might be off putting to some app developers. The same goes for sharing a password between two separate systems. At the end of the day you need to make your own choices. I’m just going to show you one generic way you can handle this in your quest to create a no code crypto wallet.
Creating the Wallet Account on Two Systems
Okay, so here I have my “create wallet account” sign up form. Now you’ll notice I only have an input field for username, password and pin. Which you’ll hopefully remember were the requirements of the nexus user creation process. But what about email address, and password for bubble which are strict requirements?
So let’s jump into my bubble workflow so you can see how I’ve handled this.
Okay, so at a top level, you’ll see I have three steps in this workflow. The first step involves creating a user on the nexus blockchain. The second step here allows me to create a user account within my bubble application and the third step simply shows a success message to the user in the front-end if this workflow has finished successfully.
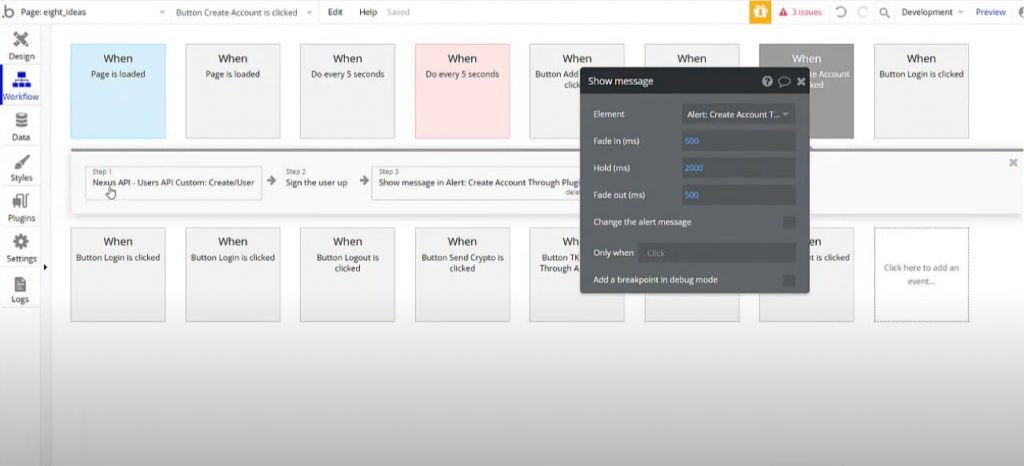
Okay, let’s dive in deeper to each step now. Essentially, when I’m creating a new user on the nexus blockchain I’m simply mapping these input fields from the front-end into the required fields which you see in the workflow in the screenshot above.
Using the free Nexus blockchain plugin or using Bubbles Free API connector plugin, as I’m doing in this example is an easy way to interface with the Nexus blockchain. In this example, we’re using the API to create a new user, but the process is almost identical if you’re using the free plugin.

Signing The User Up For Bubble
The next step is a bit more challenging because remember, even though, after this first step, the user is now signed up with an account on the blockchain, we don’t want to ask for them to sign up again for our Bubble application. So here is one suggestion which allows you to do two things at once.
So if I dive deeper into my second step here, you’ll see that I’m asked for the basic bubble login requirements. Those are email and password.

However, you’ll remember that in my front-end I didn’t set up my application to ask users for their email address. So the reason I’m able to do this, if we jump back into my workflow here and expand the second step (see above), you’ll see that I’m using a creative workaround to the email address issue. Essentially, what I’m doing is I’m taking a response from step one, which is the user’s genesis id, and I’m appending it onto a fake email address.
This does a couple of important things. First, each user account in bubble requires unique email addresses. Two users can’t have the same email address. So I have to find a way to secretly create a unique throwaway email for each new user sign up.
Luckily, during step one when the user registered for the Nexus blockchain we’ll get a response which includes the new user’s “genesis id”. A genesis id is just kind of a fancy blockchain’s way of saying user id. If I login into my nexus account here, you’ll see under my username I have a genesis id.
This id doesn’t change and it’s created as soon as I create my account for the first time. So jumping back into bubble, I can use that Id as the first part of my user’s throwaway email address and then simply “append” any fake email address I want onto the end.
So what this is now doing is satisfying Bubble’s requirement for an email address, while at the same time allowing the user not to really have to give us their real email address. Again, this way, I can keep my sign up form as simple as possible to reduce sign up friction.
Okay, back into my workflow again. Remember, bubble, besides requiring an email address, also requires a password. Again, there are multiple ways to do this, but one of the easiest is to simply use the password the user gave in the front-end here for both the blockchain as well as your bubble application. Essentially, the same password can log a user into both systems. Again, there are pros and cons to this approach, but I’m just showing you one way you can deal with this sign up process.
Storing Additional Blockchain Information
Lastly, two other things I’m storing here are the users blockchain username, and their genesis id, both of which will never change. Again, this is optional, but the reason why I want to store these is because it allows me to use this data dynamically within my application to streamline processes and reduce overall friction. Let me give you an example.
Here, remember I’m building a wallet. Now keep in mind that every blockchain API call will have requirements. For example, The nexus blockchain requirements for me to send NXS through my application require that I have the following parameters:
– A pin
– Session
– Amount
– Address From
– And Address to
Well in my opinion, you don’t want to have to fill out 5 fields. It’s a lot to ask the user to just send a transaction.
As you can see here, I’m only asking the user for 3 things, even though the API requires a minimum of 5. So again, how am I getting around this?
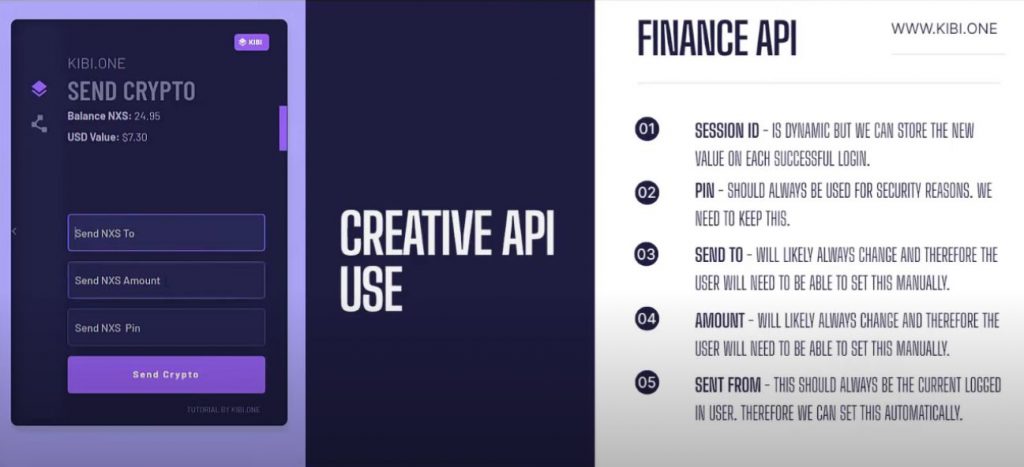
Well first of all, session id is easy. It’s dyamamic and we can store a new session id for that user each time a user logs in. so that just happens behind the scenes and we can pull that data dynamically from our database. But this still leaves us with 4 fields.
Again, we shouldn’t get rid of pin for security reasons. So we have to keep that, and we have to know who we want to send NXS to, which will likely change each time we send NXS, and we also need to know how much we want to send each time we send NXS, which will likely also change each time. So we can’t get rid of these. But what about “address from”. The logged in user will always be the sending user.
If you login to your bitcoin wallet or ethereum wallet for example, and you send crypto from your account to another account… it’s always you who’s sending. You don’t want the application to ask you who is sending the money. But in our case, the API needs to know this data. So we need to satisfy the needs of the underlying technology, without inconveniencing our users.
No Code Blockchain Development Requires Creative Thinking
Again, this just requires some upfront planning and creative thinking. But one way to deal with this is during the sign up process. Remember, previously, I showed you how I was storing the user’s genesis id, which remember will never change, during the account creation process? Well now I have that piece of information that the API requires as a parameter so I can design my application in a way to give this data to the Nexus API without having to bother my users about it. This gives my user a streamlined experience while allowing me, as the application designer, to satisfy the requirements of the underlying tech.
Using APIs Within Your No Code Cyptocurrency Wallet
Because I don’t want to speak in abstractions, let me just quickly jump over into my plugin section here and show you what I have for my API setup here. Notice I have set up many api calls here, but the API call we’re using to create our wallet is this one here which I’ve called “Finance API Custom: debit/nxs”.

Now notice, if I scroll down, under my JSON object, I’m required to use a minimum of these 5 parameters. So in the backend of my bubble application this is where I’m setting that up in order for me to use this api call within my application. Again, you could skip this step if you’re using the free Nexus plugin, but personally I find working with the API more flexible.
The No Code Cyptocurrency Wallet Is All Set Up Now
So at the end of the day, we have our login system and wallet now. I can easily show my NXS balance (see in the video above), as well as any other system or account information I want and then allow users to transact through my application.
Again, doing something similar using the paid Web3 and metamask plugin would be entirely possible as well which would allow you to interact with the Ethereum blockchain, smart contracts and ERC 20 tokens.
Sending Payments Back and Forth
So now let me just quickly show you this works by bouncing back and forth between two accounts under my control. I’m going to send 10 NXS from one account to another.
Now, in under 1 minute, this transaction will have arrived in the destination account. So it’s been one minute and I’ve refreshed my page and you can see that now this account to the left is down 10 NXS and this account to the right is up 10NXS. Please watch the video above to see this transaction take place.
For all live, mainnet transactions, these transactions can be verified in your Nexus wallet as well. However, for your application users, you’re often trying to abstract this blockchain system away from the user so they don’t need to download anything or create accounts anywhere else. Essentially, you, as the app designer, can use the Nexus bubble plugin or API connector plugin to interface with the blockchain and pull in all relevant data so your users get a streamlined, user friendly and more customized experience.
Another really interesting thing about creating a wallet like this, not only can I transact using NXS, but if I’m working on the Nexus blockchain, I can add as many tokens or assets to this wallet as I want, creating essentially a multi-currency wallet.
Assets, Partial Owenership, Revenue Share & More
Another fascinating feature of this setup we have here, is that I can use these exact input fields to pay an underlying asset on the blockchain.
Let me give you a hypothetical example. Imagine we have User 1 and User 2 who both own 50% of the underlying “apartment asset”. Now let’s imagine User 3 want to rent that underlying apartment for, let’s use simple numbers, 1000 NXS / month. User 3 would simply need to login to their wallet and send 1000 NXS to the address of the underlying apartment address and the blockchain will automatically split the payment from this transaction based on % ownership of the underlying asset. Therefore, user 1 would get 500 NXs and User 2 would get 500 NXS.
And fractional ownership can get much more granular and interesting than this. For example, imagine you tokenized an art asset on the blockchain and distributed partial ownership of that piece of art.
Imagine a gallery comes along and wantd to rent the art for 1 month. Again, they pay the underlying art asset and the funds get automatically distributed based on the percentage of ownership of each user. Because the payment is made to the address of the underlying asset, which will never change, the revenue share is automated based on who owns what at any given point in time.
No Code Blockchain Development Course
So if this is interesting to you and you want to learn more, we offer a comprehensive no-code blockchain development course where we start from scratch, I mean we start from absolute zero, and we teach non-technical founders how to build blockchain applications from the ground up.
Thanks for stopping by today.
Kibi.One is a no-code SaaS incubation program focused on helping non-technical founders build software companies. Visit our homepage to learn more about our program.
Build SaaS Platforms Without Code
Kibi.One is a platform development incubator that helps non-technical founders and entrepreneurs build software companies without having to know how to code.
We're so sure of our program, that if it's doesn't generate a positive ROI for you, we'll buy your platform from you. Watch the video to the right to learn more.